Blog

Installation et Configuration de Jenkins

Qu’est ce que Jenkins ?

Jenkins est un outil open source d’intégration continue, fork de l’outil Hudson après les différends entre son auteur, Kohsuke Kawaguchi, et Oracle. Écrit en Java, Jenkins fonctionne dans un conteneur de servlets tel qu’Apache Tomcat, ou en mode autonome avec son propre serveur Web embarqué.
Il s’interface avec des systèmes de gestion de versions tels que CVS, Git et Subversion, et exécute des projets basés sur Apache Ant et Apache Maven aussi bien que des scripts arbitraires en shell Unix ou batch Windows.
Les générations de projets peuvent être amorcées par différents moyens, tels que des mécanismes de planification similaires au cron, des systèmes de dépendances entre générations, ou par des requêtes sur certaines URL spécifiques.
Autour de 2008, Jenkins est devenu une solution de remplacement populaire3 à l’outil de référence CruiseControl.
Source

Comment ca fonctionne ?

Tout commence avec un serveur Maître, sur lequel viennent se connecter les Agents :
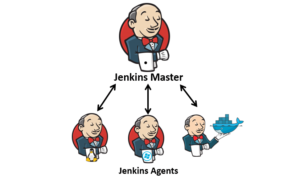
Le Serveur Maître va lancer differnets Tâches sur ces agents (construction d’applications, preparation d’environnements, déploiements …)

pour plus d’informations voir le site officiel jenkins.io

Installation

Prérequis

  • Avoir Docker installer et fonctionnel sur son serveur

Serveur Maître

lancer le docker jenkins avec la commande suivante :

docker run -d -name JenkinsMaster -p 8080:8080 -p 50000:50000 -v jenkins_home:/var/jenkins_home jenkins/jenkins:lts

Ou Jenkins_home doit être remplacer par le chemin de votre choix (cela permettra d’avoir acces a la configuration ulterieurement)
Plus d’informations sur ce docker et ces paramètres sur le Github de Jenkins.

Serveur Agent (nodes)

Agents SSH

Configuration coté Maître

Génération des clefs SSH

Pour deployer des agents SSH il faut créer des cléfs de chiffrements public et privé sur le serveur Maître.
Pour cela connecter vous à une console sur le docker JenkinsMaster :

docker exec -it JenkinsMaster /bin/bash

Ce connecter en tant que jenkins:

su - jenkins
ssh-keygen
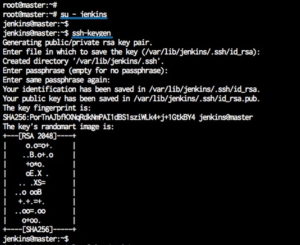

Saisir une PassPhrase et bien l’enregistrer pour plus tard.

Ajout de l’utilisateur dans Jenkins

Dans Jenkins, aller dans Crédentials, et cliquer sur global:
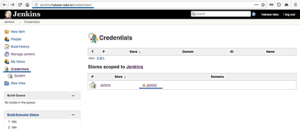
Puis cliquer sur Add Credentials, et saisir les infos du compte :
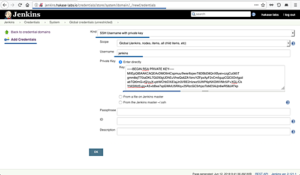
Type de compte : selectionner SSH Usernanme with private key
Scope : Global
Username: jenkins
Private Key : saisir la clef privé (id_rsa) obtenu à l’étape précédente.
Dans le docker JenkinsMaster vous la trouverez en tapant la commande suivante :

cat /var/jenkins_home/.ssh/id_rsa

PassPhrase : Saisir la PassPhrase saisie au moment de la génération de la clef

Puis cliquer enfin sur OK, votre utilisateur est configuré sur votre Maître.

Installation de « l’Agent » SSH

Comme pour la Master cette agent fonctionnera sous Docker.
Pour le lancer il suffit d’éxécuter la commande suivante :

docker run jenkins/ssh-slave "<public key>"

Remplacer <public key> par la clef publique obtenue sur le Maître
Sur le serveur Maître executer la commande suivante pour afficher la clef :

cat /var/jenkins_home/.ssh/id_rsa.pub

Plus d’informations sur ce docker et ces paramètres sur le Github de Jenkins.

Configuration du nouveau noeud dans Jenkins

Se rendre dans Manage, puis Manage Nodes, faire Add Nodes :
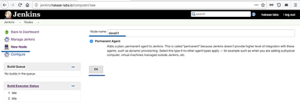
Choisir permanent agent, et lui donner un nom (ssh-slave01 par exemple), cliquer ensuite sur OK
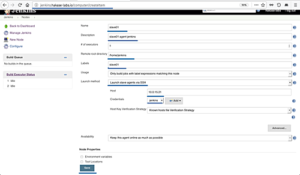
Saisir les informatiosn suivantes:

  • Remote root directory: /home/jenkins
  • Labels: slave01
  • Launch method: Launch slave agent via SSH
  • Entrer l’addresse IP de votre agent (ici celui de notre hôte Docker)
  • Selectionner le crédential ‘Jenkins’ créer précédement.
  • Host Key Verification Strategy Selectionner Manually Trusted key verification Startegy (il vous seras demander de la valider au premier lancement du Noeud)

Aller dans Advanced, si vous avez modifier le port ssh du docker agent, remplacer 22 par lecelui que vous avez choisi.
Saisir le JavaPath avec : /usr/local/openjdk-8/bin/java

Cliquer enfin sur Enregistrer.

Démarrage du Noeud

Dans la liste des noeud disponible, selectionner le noeud nouvellement créer et cliquer sur Launch.
Dans le menu gauche, une nouvelle ligne apparait vous demandant de valider la clef de connexion, cliquer dessus et accepter.
Votre Agent est maintenant démarrer.

Source :
https://www.howtoforge.com/tutorial/ubuntu-jenkins-master-slave/
https://jenkins.io/
https://www.docker.com/

Configuration de Jenkins avec GitLab

Note:In GitLab 8.3, Jenkins integration using theGitLab Hook Pluginwas deprecated in favor of theGitLab Plugin.The deprecated integration has been renamed to Jenkins CI (Deprecated) in theproject service settings. We may remove this in a future release and recommendusing the new \’Jenkins CI\’ project service instead which is described in thisdocument.

Overview

Jenkins is a great Continuous Integration tool, similar to our built-inGitLab CI.
GitLab\’s Jenkins integration allows you to trigger a Jenkins build when youpush code to a repository, or when a merge request is created. Additionally,it shows the pipeline status on merge requests widgets and on the project\’s home page.
Videos are also available on GitLab workflow with Jira issues and Jenkins pipelinesand Migrating from Jenkins to GitLab.

Use cases

  • Suppose you are new to GitLab, and want to keep using Jenkins until you prepare your projects to build with GitLab CI/CD. You set up the integration between GitLab and Jenkins, then you migrate to GitLab CI later. While you organize yourself and your team to onboard GitLab, you keep your pipelines running with Jenkins, but view the results in your project\’s repository in GitLab.- Your team uses Jenkins Plugins for other proceedings, therefore, you opt for keep using Jenkins to build your apps. Show the results of your pipelines directly in GitLab.
    For a real use case, read the blog post Continuous integration: From Jenkins to GitLab using Docker.
    NOTE: Moving from a traditional CI plug-in to a single application for the entire software development lifecycle can decrease hours spent on maintaining toolchains by 10% or more.Visit the \’GitLab vs. Jenkins\’ comparison page to learn how our built-in CI compares to Jenkins.

Requirements

Configure GitLab users

Create a user or choose an existing user that Jenkins will use to interactthrough the GitLab API. This user will need to be a global Admin or addedas a member to each Group/Project. Developer permission is required for reportingbuild status. This is because a successful build status can trigger a mergewhen \’Merge when pipeline succeeds\’ feature is used. Some features of the GitLabPlugin may require additional privileges. For example, there is an option toaccept a merge request if the build is successful. Using this feature wouldrequire developer, maintainer or owner-level permission.
Copy the private API token from Profile Settings -> Account. You will need thiswhen configuring the Jenkins server later.

Configure the Jenkins server

Install Jenkins GitLab Pluginand Jenkins Git Plugin.
Go to Manage Jenkins -> Configure System and scroll down to the \’GitLab\’ section.Enter the GitLab server URL in the \’GitLab host URL\’ field and paste the API tokencopied earlier in the \’API Token\’ field.
For more information, see GitLab Plugin documentation about Jenkins-to-GitLab authentication
Jenkins GitLab plugin configuration

Configure a Jenkins project

Follow the GitLab Plugin documentation about Jenkins Job Configuration.
NOTE: Note:Be sure to include the steps about Build status configuration.The \’Publish build status to GitLab\’ post-build step is required to viewJenkins build status in GitLab Merge Requests.

Configure a GitLab project

Create a new GitLab project or choose an existing one. Then, go to Integrations ->Jenkins CI.
Check the \’Active\’ box. Select whether you want GitLab to trigger a buildon push, Merge Request creation, tag push, or any combination of these. Werecommend unchecking \’Merge Request events\’ unless you have a specific use-casethat requires re-building a commit when a merge request is created. With \’Pushevents\’ selected, GitLab will build the latest commit on each push and the buildstatus will be displayed in the merge request.
Enter the Jenkins URL and Project name. The project name should be URL-friendlywhere spaces are replaced with underscores. To be safe, copy the project namefrom the URL bar of your browser while viewing the Jenkins project.
Optionally, enter a username and password if your Jenkins server requiresauthentication.
GitLab service settings

Plugin functional overview

GitLab does not contain a database table listing commits. Commits are alwaysread from the repository directly. Therefore, it is not possible to retain thebuild status of a commit in GitLab. This is overcome by requesting buildinformation from the integrated CI tool. The CI tool is responsible for creatingand storing build status for Commits and Merge Requests.

Steps required to implement a similar integration

Note:All steps are implemented using AJAX requests on the merge request page.

  1. In order to display the build status in a merge request you must create a project service in GitLab.1. Your project service will do a (JSON) query to a URL of the CI tool with the SHA1 of the commit.1. The project service builds this URL and payload based on project service settings and knowledge of the CI tool.1. The response is parsed to give a response in GitLab (success/failed/pending).
    ## Troubleshooting
    ### Error in merge requests – Could not connect to the CI server
    This integration relies on Jenkins reporting the build status back to GitLab viathe Commit Status API.
    The error \’Could not connect to the CI server\’ usually means that GitLab did notreceive a build status update via the API. Either Jenkins was not properlyconfigured or there was an error reporting the status via the API.
  2. Configure the Jenkins server for GitLab API access1. Configure a Jenkins project, including the \’Publish build status to GitLab\’ post-build action.

https://docs.gitlab.com/ee/integration/jenkins.html

Jenkins-to-GitLab authentication

PLEASE NOTE: This auth configuration is only used for accessing the GitLab API for sending build status to GitLab. It is not used for cloning git repos. The credentials for cloning (usually SSH credentials) should be configured separately, in the git plugin.

This plugin can be configured to send build status messages to GitLab, which show up in the GitLab Merge Request UI. To enable this functionality:

  1. Create a new user in GitLab
  2. Give this user \’Developer\’ permissions on each repo you want Jenkins to send build status to
  3. Log in or \’Impersonate\’ that user in GitLab, click the user\’s icon/avatar and choose Settings
  4. Click on \’Access Tokens\’
  5. Create a token named e.g. \’jenkins\’ with \’api\’ scope; expiration is optional
  6. Copy the token immediately, it cannot be accessed after you leave this page
  7. On the Global Configuration page in Jenkins, in the GitLab configuration section, supply the GitLab host URL, e.g. http://your.gitlab.server
  8. Click the \’Add\’ button to add a credential, choose \’GitLab API token\’ as the kind of credential, and paste your GitLab user\’s API key into the \’API token\’ field
  9. Click the \’Test Connection\’ button; it should succeed

https://github.com/jenkinsci/gitlab-plugin#jenkins-to-gitlab-authentication